Multiple Event Opportunities in 2023 for Those Seeking Part Time Work
High Five Events, one of the largest privately owned event production companies in the United States, is offering a recruitment event for potential part time staff at the High Five Events office on January 5, 2023 at 6:30 PM in Austin, Texas.
Everyone is welcome to attend the session. It will offer the opportunity for interested people to learn the basics of working part time at High Five Events. There will be an opportunity for Q&A and to meet some full and part time staff.
“Our part time staff is crucial to the success of each one of our multiple events,” said Dan Carroll, co-owner of High Five Events. “This is a great opportunity for those interested in event production, learning more about the behind-the-scenes of running and triathlon events, and also for extra income or to meet new people.”
No previous event experience is required, but willingness to work outside and on weekends is necessary for successful applicants. Part time staff join the crew for the weekend days of the event, but many will work during the week leading up to the event as well.
Below is the calendar of events for 2023 part time work:
For those interested in becoming part of the crew, please complete this form to provide your contact information and if you will attend the session.
https://captextri.com/wp-content/uploads/2023/01/3.png400495Mkt.Assisthttps://captextri.com/wp-content/uploads/2022/05/AS_CAPTEX_LOGO_MOCK-UP_FULL_COLOR-400x197.pngMkt.Assist2023-01-03 14:13:142023-02-20 09:00:04High Five Events To Host Information Session for Potential Part-Time Staff
Elastic laces are a popular choice for triathletes because they are comfortable and secure. They stay in place during vigorous activity, yet they’re also easy to take off when you need to transition from one stage of the race to another. In this blog post, we’ll tell you everything you need to know about elastic laces, including how to use them and why they’re so beneficial for triathletes.
How to Use Elastic Laces
Elastic laces are easy to use – simply tie them in a knot and then thread the excess through the loop at the end of the lace. Once you’ve done that, pull the lace tight and trim off any excess. You can also tuck the excess lace into your shoe so that it’s out of the way.
Why Use Elastic Laces?
There are several reasons why elastic laces are a good choice for triathletes. First, they’re comfortable – they won’t rub or chafe your skin like traditional laces can. Second, they’re secure – you don’t have to worry about them coming undone during your race. Third, they’re quick and easy to take off – just untie the knot and slip your shoes off without having to stop and re-tie your laces. Fourth, they come in a variety of colors – so you can find a pair that matches your race gear or personal style. Fifth, they’re affordable – you can find a quality pair of elastic laces for less than $20.
Elastic laces are a great choice for beginner triathletes because they are comfortable, secure, and easy to use. They also come in a variety of colors and styles, so you can find a pair that matches your race gear or personal style. If you’re looking for an affordable pair of elastic laces, we recommend checking out:
LOCK LACES – Elastic No Tie Shoelaces
$6.50
RJ-Sport Tieless Elastic Shoe Laces
$6.99
Nathan, Elastic No Tie Shoe Laces for Running and Active Sports
$6.11
Elastic Shoe Laces for Kids and Adults
$6.99
KIWI Sneaker No-Tie Shoe Laces
$6.88
No Tie Shoelaces – Tieless Elastic Shoe Laces – Strong Lock Laces
$5.99
https://captextri.com/wp-content/uploads/2022/10/How-Why-to-Use-Elastic-Laces-for-Triathlons-blog.jpg400495CapTex Trihttps://captextri.com/wp-content/uploads/2022/05/AS_CAPTEX_LOGO_MOCK-UP_FULL_COLOR-400x197.pngCapTex Tri2022-10-13 10:26:562022-10-13 10:26:56How & Why to Use Elastic Laces for Triathlons
The dynamic nature of triathlon makes it special and challenging at the same time. Triathlon races demand a lot of agility. There are common mistakes that triathletes make while going for this thrilling event. Due to these mistakes, the path to perfection may seem full of pitfalls. In order to avoid these mistakes, you need to identify them. That’s why we have prepared a list of some common mistakes made by triathletes while training and the ways to avoid them
Lack of proper training plan and schedule
Triathlon is an amalgamation of three events i.e. swimming, cycling, and running. It requires a lot of effort. But the effort needs to be channeled in the right direction. Doing bits and pieces of everything every day is not going to help.
Triathletes need to realize their strong zones and take note of their weak points. Based on these observations proper training schedules should be prepared. The focus should be given to both individual and integrated training of the events.
Exhaustive training sessions
Sometimes triathletes go through exhaustive endurance training. They try to stretch the limit of their body. This increases their time spent on training but rather than constructive fitness for triathlon, it results in fatigue.
Take the hints from the days when you are extremely exhausted. Understand the limitations of your body. When tired, rest or go for low-intensity training sessions.
Setting unachievable goals
After only a few weeks of training, some triathletes tend to come under peer pressure and set tough goals for themselves. They even try to imitate the training schedules of professionals.
Try to avoid such instances and focus on your own growth curve. Do not sign up for races on close dates. This may exhaust you, give your body some time to recover. Observe yourself and see how you are becoming better day by day.
An inadequate period of rest
Many people fail to understand that the period of rest is the time when the body adjusts to the stimuli created by training.
Appreciate the physiological need for rest and do not over-train yourself. Maintain a good sleep cycle. Keep yourself relaxed. Give your body some time to recover and adapt to the changes.
Not being familiar with the rules
New triathletes may not be well versed with the rules of triathlon events. Sometimes people avoid the pain of going through all the rules.
But rules are an important part of every sport. Triathletes should familiarize themselves with the rules of the race beforehand. Plus make sure all the components of the racecourse are in your immediate vision.
Improper diet and hydration
The body requires proper nutrition for adapting to the training schedule. Some triathletes try trendy diets with food alternatives and neglect their fundamental diet.
Take care of your food habit. Do not skip meals, eat healthily. If you will take care of your body, it reward you by enhancing your performance. Consuming sufficient water and electrolytes is also essential.
Underestimating transition training
By completing the transitions swiftly, you can save a lot of time. Transition training is a very tactical aspect of triathlon. But a lot of triathletes do not pay much attention to it. This in turn adds a few minutes to their timing.
Reducing a few seconds from your timing by pacing up on the track may take months of training and huge efforts. Transition training can reduce minutes from your timing just by using some trivial strategies. That’s why you should never forget to train yourself for the transitions.
https://captextri.com/wp-content/uploads/2022/06/1356472_CapTex-Common-Mistakes-Triathletes-Make-How-to-Avoid-Them6_042622.png400495CapTex Trihttps://captextri.com/wp-content/uploads/2022/05/AS_CAPTEX_LOGO_MOCK-UP_FULL_COLOR-400x197.pngCapTex Tri2022-06-09 15:13:182022-06-09 15:13:18Common Mistakes Triathletes Make and How to Avoid Them
By Glen Gore, former pro triathlete and current coach.
If ever there was a hot topic of debate, it comes in the form of triathlon nutrition and more importantly, nutrition intake on race days.
What exactly do you need to eat and drink, and when?
To start this editorial piece, we need to agree that there is no magic formula that will work the same for everyone. Each of us differs in our body mechanics and the way we work with nutritional absorption that it’s almost impossible to pinpoint one clear plan that will work for everyone.
Having said that, you can still use sound advice and at least start on the right track. For us, nutrition is another important discipline in the sport of triathlon. The fastest and most finely tuned sports car in the world will go nowhere fast if there is no fuel in the tank. Similarly no matter how hard you have trained and prepared if you are going to race on zero nutrition, your body (engine) is going to slowly come to a complete stop and falter.
Rule no 1 – don’t neglect your nutritional intake on race days. It’s quite easy to “forget” to drink and eat when you are giving 100% during an all-out race effort. Just know that sooner or later, you will start to run out of energy stores and that is when racing becomes anything but fun.
Fuelling is different depending on the distance
A Sprint Distance triathlon race is completely different from an Olympic, Half, or full Ironman distance event. These distances require different amounts of training loads to be fully prepared to take on the challenge. The same rule applies to how you fuel the body during an event that takes less than 60 mins compared to an event that may take up to 17hrs.
Sprint
A sprint race normally lasts anywhere between 52 minutes for the PRO’s up to say 1.5-2hrs for the backmarkers. Most of the time – depending on weather conditions, you can get away with next to nothing in the form of intake over the sprint distance. Some hydration via a small sports bottle and perhaps 1-2 gels for the bike and run should sufficiently see you through the event.
I have often found that my best results over the sprint distance come when I go in “light” – not much food in the tank – that empty feeling but with just enough energy stores from the previous night’s meal or early morning small breakfast to see me through the event.
Hydration is always important – you never want to start any event “thirsty” so make sure the fluid levels are topped up in the form of small sips. A huge intake of fluids just before the start is not a suggested best practice for an optimum result over short distances.
These should be taken as pure guidelines and not as hard-fast rules – these suggestions come from trial and error on the battlefield.
Olympic
When you compete in an event that spans longer than 2hrs, then you need to start looking at a more efficient fueling system.
The Olympic distance event can take anywhere from 2hrs to 3hrs plus – eating and drinking now becomes more important. If you are not fuelling adequately over the 40km cycle, you will feel the burn when you enter the hunt on the 10km run.
Some athletes require less nutritional intake than others while others may require more fluid intake. The best place to learn what your body requires is by trial and error. The more you race over this distance, the more you will learn as to what you require and when.
Half-Distance
When the event time spans over 4hrs in duration right up to 8h30, then you will need a tried and tested method, worked on in training, to see you adequately fuelled in a race that covers a whopping 113km.
The many trained brick sessions will give you a firm indication of what will work for you on race day and what will not. It does become quite expensive when your training sessions have to mimic race days but as the saying goes, practice makes perfect. The more you practice eating and drinking over the longer distances in training, the easier the transition will be from training days to half-distance racing days.
Full IM Distance
So many athletes have “bonked” or “hit the wall” over the full IM distance simply because they ran out of fuel. The body was prepared, the mental side was in place but the “engine” for some reason was neglected.
Firstly consider that a normal day at work would require someone to eat breakfast, lunch, and dinner. Now add in 3.8km of swimming, 180km of biking, and a 42.2km marathon to top it all off, covered in a time that may span at least 17hrs. Now it becomes apparent just how much food and drink is required to keep you moving along at an optimum level.
Best Fuelling Tactics during Training
Find a product that works and more importantly is cost-effective. Just because it’s expensive does not mean it’s better.
Trial and Error – the brick session will help you develop a suitable war plan for race days. If it works in training, more than likely it will work during the race.
Make sure you re-fuel within 15-30 minutes after a strenuous workout. As athletes, we often neglect the post-training refueling strategy. Remember you are not only eating for today but you are eating for tomorrow’s training session as well.
Best Fuelling Tactics during Racing
Eat small bits and drink small sips all the time – especially during the longer races – the reason being to keep the tank on full at all times and not deplete it before you think about replenishing.
Cut up your energy bars into small bite-size pieces – this is much easier to eat and digest while on the move.
Get in some solid food sources quickly once you are done with the swim. The longer the duration of the event, the more advisable to start the cycle with something a little more substantial than just a gel.
Don’t overload your bike with too much nutrition and hydration. This makes that very expensive bike extremely heavy. The bigger races have more than an ample supply of nutrition along the way – make use of it even if you need to stop briefly and take some on-board.
Don’t start the run in a hurry. T2 over long distances is a time where you need to relax a little and consume some solid nutrition before you head out onto the run. Whatever time you lose in transition you will more than makeup, especially when the run distance is over a full standard marathon.
Common Fuelling Mistakes
Eating only when hungry – this means it’s already too late. It will take you a long time to get back those lost energy stores, time which you won’t have during the race days.
Drinking only when thirsty. Once again, this is too late – if you are feeling thirsty you are already on the way to partial dehydration. Keep on sipping water and juice so you never get to feel that thirst.
Trying new stuff on race day. Stick to what you know and what you have trained on.
Don’t alter the nutritional plan. What you practiced in training, do the same on race day. Don’t change the formula, there is a good chance it won’t work.
Drinking too much. This can be a problem worse than drinking too little so take the race weather conditions on the day into account and drink what is normal for you.
Nutrition is important, a successful race plan always has a well thought out nutritional plan that goes along with it, and remember, it takes trial and error to perfect – good luck!
https://captextri.com/wp-content/uploads/2022/05/1370427_CapTex2022-WhatToEat_495x400_051322.png400495CapTex Trihttps://captextri.com/wp-content/uploads/2022/05/AS_CAPTEX_LOGO_MOCK-UP_FULL_COLOR-400x197.pngCapTex Tri2022-05-16 14:09:302022-05-17 13:11:22What to Eat and When During a Triathlon
Sometimes because of colder water temperatures, a tri suit is not enough and triathletes will opt to add a wetsuit to wear during the swim. Wearing a wetsuit has many advantages and a few disadvantages, so what are they? When are they helpful or even required? Should I go for a two-piece or one-piece? We created this wetsuit guide to help you make the right decision for your event.
Remember the golden rule: Nothing new on race day. Unless you have an opportunity to swim in the exact wetsuit you will wear on race day at least once before, it is advised to not try something new the day of the race.
Types of wetsuits
A wetsuit is a neoprene insulation suit made for warmth during the swim portion of a triathlon. Triathlon wetsuits are different from other water sports wetsuits and are regulated by governing bodies like USAT. Wetsuits for a triathlon cannot be more the 5mm thick.
The two most common types are sleeved and sleeveless. Full-sleeved wetsuits are better for the coldest water temperatures and are the most efficient. Sleeveless is great for cooler water temperatures but lets in water which can cause drag. Short “jammer” styles have gained in popularity for short-distance triathlons since they are the easiest to put on and take off.
In terms of cost, sleeveless is usually less expensive. Less expensive wetsuits will also typically have uniform neoprene while the materials in high-end suits will vary across the body and incorporate more technology into the fabric.
Remember, you want the fit to be snug, but not restrict breathing or inhibit arm movement.
Why Wear a Wetsuit?
“Free” Speed
Wearing a wetsuit is one of the easiest ways to get faster swim times. The suit allows the wearer to swim faster and reduces the effort the swimmer has to put in. The better the swimmer the less advantage the wetsuit may show. A swimmer can expect to save anywhere from a few seconds to tens of seconds per 100 meters. Usually, the longer the distance the more the savings are noticeable. With less exertion in the water, you will feel less of an energy drain as you are heading up to T1.
Warmth
The wetsuit can provide warmth to the swimmer in the cold water. If you are sensitive to the cold the coverage can be great at making you more comfortable in the water. Wetsuits are highly advised for water temps between 50 to 65 degrees.
Why Not Wear a Wetsuit?
Cost
Wetsuits can be a big investment costing anywhere from just over $100 to almost $1000. You can check with local stores to see if they rent suits or try and find second-hand wetsuits through Facebook groups. It is also important that you take proper care of the wetsuit as the neoprene can degrade over time.
Constricting
Wetsuits should fit snugly without restricting breathing. That said, some people still find them to cause a claustrophobic feeling especially once they start warming up from swimming. Practicing is important so you can see how your body reacts. If you panic or feel uncomfortable in a full sleeve, you might try a sleeveless wetsuit or wetsuit jammers.
Added Time For Taking Off
While they may save you time while swimming, you still have to get out of the wetsuit. This can add minutes to your transition time.
So, to sum it up, for a short swim of a super sprint or sprint triathlon, the time savings of wearing a wetsuit can be negligible. It is really a toss-up to how you feel on race morning and what you have trained for. Pack it in your bag and if it comes time to leave transition and you don’t want to wear it, simply leave it by your bike. For longer distances like an Olympic or Half Distance, a wetsuit will have clear time-saving benefits that outweigh the extra time of removing the suit.
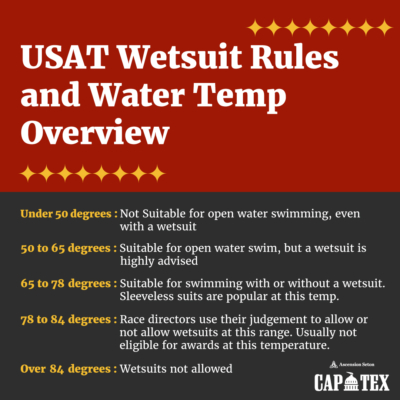
USAT’s Rule on Wetsuits and Water Temperatures
All temps refer to surface water temperatures
Under 50 degrees: Not suitable for open water swimming, even with a wetsuit
50 to 65 degrees: Suitable for open water swim, but a wetsuit is highly advised
65 – 78 degrees: Suitable for swimming with or without a wetsuit. Sleeveless suits are popular at this temp.
78 – 84 degrees: Race directors use their judgment to allow or not allow wetsuits at this range. Usually not eligible for awards at this temperature.
Over 84 degrees: Wetsuits not allowed
https://captextri.com/wp-content/uploads/2022/04/1343541_CapTexTriGraphics1200x600V2_040822-1.jpg400495CapTex Trihttps://captextri.com/wp-content/uploads/2022/05/AS_CAPTEX_LOGO_MOCK-UP_FULL_COLOR-400x197.pngCapTex Tri2022-04-21 15:56:312022-04-21 15:56:31When to Wear a Wetsuit
A triathlon is a competition with three sports, which means there are two points in the race where you must transition from one sport to the next. It can take a lot of practice to get good at transitioning between the sports, but there are things you can do to make it faster!
We made a list of some simple strategies can that can help you speed up your triathlon transitions.
Visualize a Plan & Practice on it
Triathletes should be ready with a plan and train themselves accordingly beforehand. You should practice rigorously and leave no room for error. Learning to execute the plan perfectly will enable you to have quick transitions.
Getting the Wetsuit Off Faster
Applying a lubricant to your body before putting on the wetsuit will enable you to slide out of it easily during the first transition. Locating the zip cord quickly and kicking off the suit as soon as possible saves a lot of time.
Only the Essentials
Take things that are absolutely essential. Skipping unnecessary items reduces the number of tasks to be done and saves time.
Be Quick With the Helmet
Your helmet should be kept unfastened prior to the race. Make proper adjustments so that it fits your head and can be removed comfortably. Train yourself to secure the helmet on your head as quickly as possible.
Use This Bike Shoe Trick
Fastening your shoes to the pedals of your bike expedites the process of transition. Thin rubber bands can be used for this purpose. Keep the shoes fully loosened so that you can sit on the bike and put them on swiftly.
Running With the Bike
In the transition zone between swimming and cycling, you are not allowed to ride your bike. Practice running safely and smoothly while holding your bike. By clearing this distance quickly you can deduct some seconds from your overall timing.
Putting on the Running Shoes
You can sprinkle some talcum powder on your running shoes to facilitate a smooth entry of your feet into the shoes. Swap your ordinary shoelaces with speed laces or lace locks.
Maintain Balance
Some of these strategies like wearing shoes while sitting on the bike may seem a little difficult to achieve. But proper training can help you achieve the perfect balance. Along with quick execution, steadiness is also important. Do not move too fast, maintain proper balance.
Study the Racetrack Properly
Have the map of the racetrack in your mind. Repeatedly play the whole scenario in your imagination and prepare yourself to take the right step at the right time.
Training your body and mind for faster triathlon transitions gives you an edge over others, which is why triathletes should incorporate transition practice and the suggestions above into their tri training sessions.
https://captextri.com/wp-content/uploads/2022/04/1341382_CapTex-GetOutofTransitionFaster_495x400_040822.jpg400495CapTex Trihttps://captextri.com/wp-content/uploads/2022/05/AS_CAPTEX_LOGO_MOCK-UP_FULL_COLOR-400x197.pngCapTex Tri2022-04-18 09:19:092022-05-11 14:46:02How Can I Speed Up My Triathlon Transitions?
You signed up for a triathlon and chances are you are probably doing 99% of your training in a swimming pool. Breathing can be a challenge for many swimmers, which can be exaggerated in open water where conditions may differ. Challenges with open water include turbulence, missing a breath due to waves, running into other swimmers, or starting off the swim too fast before realizing you haven’t taken a breath yet.
You can easily combat a lot of fear of open water swimming through simple drills while training in a swimming pool. Doing breath work will help prepare you for the uncertainties of open water. There is also the added benefit of oxygen capacity which can also help you on the bike and the run.
Our amazing ambassador and swim coach, Trisha Stavinoha, has put together 3 simple workouts that will improve your breathing and have you feeling calm and race-ready.
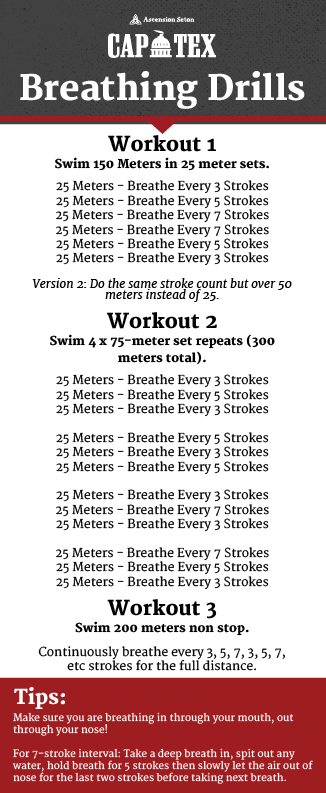
The“3-5-7”
I like to use this workout to help swimmers relax their breathing, improve their oxygen capacity and prepare them for missing a breath or two.
3-5-7 refers to how many strokes you take between breaths while swimming. This pattern requires you to use bi-lateral breathing.
Bilateral breaking means that you are breathing on both sides of your body. If you breathe only on one side, you can develop overuse injuries and have a lopsided stroke, as well as be more likely to veer to one side. This plus a current can really throw you off course requiring you to sight more which will cause your legs to drop and slow you down.
Bilateral breathing is step one in preparing you for breathing in open water. If you don’t currently breathe bilaterally, now is the time to start. Breathing every 2 strokes is too much and every 4 is not enough over a longer distance.
Here is your lesson…breathe on both sides starting with every three strokes. You will feel awkward the first couple of swims, but the following workouts will help. You can do these workouts as a warm-up or cool down to longer swim sets.
You can print the following workouts and laminate them so you have them by the pool during your swims.
Workout 1
This workout will get you comfortable taking longer times between breaths.
Swim 25 meters breathing every 3 strokes. For the next 25 meters breathe every 5 strokes. Then the next every 7 stokes. Then ladder back down 7, 5, 3 the same way.
Version 2: Do the same stroke count but over 50 meters instead of 25.
150-300 meters total (6 x 25 or 6 x 50).
Workout 2
This workout will help you learn to relax after missing a breath or catching your breath if you started off too fast.
Swim 4 x 75-meter set repeats (300 meters total).
For the first set, You will breathe every 3 strokes for the first 25 meters, then 5 for the second 25 meters, then back down to 3 for the final 25 meters. So we will call this 3, 5, 3 stroke workout. For the following sets, you will do the same but change your breathing pattern accordingly.
The second is every 5, 3, 5 strokes.
The third sight is every 3, 7, 3 strokes
The final set is every 7, 5, 3 strokes.
Workout 3
Continuously breathe every 3, 5, 7, 3, 5, 7, etc strokes for 200 meters non-stop.
If you are not ready for the 7-stroke interval of the workout, not to worry, but keep trying! Make sure you are breathing in through your mouth, out through your nose. When I do the 7-stroke interval I take a deep breath in, spit out any water, hold my breath for 5 strokes then let the air out of my nose for the last two strokes before I breathe in again.
With some practice and dedication, you’ll have these breathing drills mastered in no time, and be ready for the open water at your next triathlon.
Trisha Stavinoha, MS, RD, CSSD, CSCS
Masters Swim Coach
Surge Strength Dryland Coach
https://captextri.com/wp-content/uploads/2022/03/1330450_CapTex-Blog-Preparing-for-Open-Water-Breathing-Drills_495x400_032922.jpg400496CapTex Trihttps://captextri.com/wp-content/uploads/2022/05/AS_CAPTEX_LOGO_MOCK-UP_FULL_COLOR-400x197.pngCapTex Tri2022-04-05 07:59:122022-04-06 13:26:16Preparing for Open Water: Breathing Drills
Whether you’re training to be faster or are simply exercising to relax and destress, practicing mindfulness during your physical activities in order to better connect with your body is a great way to achieve a balanced state of mind and find joy in your training.
Often when we hear the word ‘mindfulness’ or ‘meditation’, we envision someone sitting on a yoga mat by the beach, practicing slow and thoughtful movements. But a mindful state can and should be achieved through any activity, especially in triathlon training.
What Do We Mean When We Say Mindfulness?
The simplest definition is the practice of being aware and present at the moment. When it comes to training it means we are being mentally connected to our bodies and train our minds and bodies together as one unit. When we only focus on our physical self without also training the mind, we can create a disconnect between the two, causing negative thoughts and a higher perceived exertion during an event.
Why is Mindfulness Important?
Mindfulness has been shown to help improve focus, decrease stress levels, and increase self-awareness. If you’re looking for a way to improve your performance, incorporating mindfulness into your training is definitely something you should consider. With mindfulness, you can learn how to be more patient, focused, and relaxed during physical activity- leading to better results overall.
How to Incorporate Mindfulness
1) Slow Down
Endurance activities are actually very conducive to achieving a meditative state of mind, and it starts with slowing down and focusing on your form. It’s important to be precise during swimming strokes and land lightly when running so that you can move more efficiently–don’t get frustrated if thoughts wander off while doing this! When we catch ourselves thinking about something else, just relax and refocus back onto the specific element of our movement.
2) Remember Your Goals
Also helpful while practicing mindfulness during workouts, is to have a goal for your workout and keep it top of mind. Maybe today’s goal is to add an extra mile on your run, or maybe it’s to focus on getting your core stronger. Whatever your reason may be for doing your workout, keep it locked in the forefront of your mind to help remind yourself why you’re doing the activity you’re doing.
3) Practice Belly Breathing
Another helpful tip is one we can learn from babies, which is the act of belly breathing. Inhale slowly, extending the belly outward. This helps draw the breath into the lower lungs and extend the diaphragm. By fully inflating the lungs, you’re also taking in the maximum amount of oxygen possible with each breath. These deeper inhalations keep the body relaxed and help you pace yourself and move most efficiently.
Mindfulness can be an important tool in your training arsenal, especially if you struggle with stress or focus. By practicing being aware and present, you can improve your connection to your body and train both the body and mind as one unit. When it comes to competition or a challenging workout, this can be the difference between success and failure. Give mindfulness a try and see how it impacts your performance!
https://captextri.com/wp-content/uploads/2022/03/1319870_CapTex-2022-Incorporate-Mindfulness-Into-Your-Training-Blog_495x400_031422.png400495CapTex Trihttps://captextri.com/wp-content/uploads/2022/05/AS_CAPTEX_LOGO_MOCK-UP_FULL_COLOR-400x197.pngCapTex Tri2022-03-16 06:00:312022-03-16 08:51:50Incorporate Mindfulness Into Your Training
Adding yoga to your life offers many benefits such as increasing mobility and range of motion, preventing injuries, and relieving pain. Hopefully, you already have some kind of stretching routine included in your training. If you don’t, the offseason is the perfect time to try some new things! We’ve compiled a list of the 5 most beneficial yoga poses for triathletes to combat the wear and tear we put our bodies through during training.
1. Downward Facing Dog
Purpose: This is a common pose but is especially beneficial for a triathlete with any built-up tension in your calves and feet from running. Also great for cyclists with lower back from riding. Hold this pose to help build strength in your shoulders, arms, and chest.
How To: Start on your knees with your hands out in front of you, push your bottom up until you feel a stretch in your calves and the bottom of your feet. Straighten your legs if you can, but the main thing to remember in this pose is to keep your back as flat as possible.
2. Crescent Lunge
Purpose: This pose utilizes all the muscles in your body but focuses on getting a stretch in the back of your legs, groin, and hip flexors while building strength in the front of your legs. Practicing this pose will open your range of motion in your legs and hips.
How To: Start in a standing position, and go into a lunge until your front leg is bent at a 90-degree angle. Keep your core tight to remain balanced as you lift your arms above your head. During this motion, you will feel a stretch in your triceps and chest. Take deep breaths as you hold this position, switch to your other leg, and repeat.
3. Pigeon Fold
Purpose: The Pigeon Fold is a great yoga pose for opening up your hips and getting a deep stretch in your hip flexors and glutes. Good for athletes who spend more time cycling to loosen and realign their hips after putting in hours on the bike.
How To: Start in a Downward Facing Dog, bend your right knee and sweep your leg down and place it on the mat beneath you. Lower yourself to a comfortable seated position with your left leg behind you as you feel the stretch in your quad and hamstring. Hold your chest high to focus the stretch in your legs.
4. Cross-Legged Twist
Purpose: This pose focuses on stretching your lats, shoulders, and neck. This will help reduce any pain you may have from constantly rotating your body side to side during your freestyle swim stroke. Holding this pose will lengthen and help mobility along your spine which is great for increasing your range of motion during your swim training.
How To: Begin on the floor with both legs out in front of you. Bring your knees to your chest and place the bottom of your feet on the ground. Slide your left foot on the ground under your right leg to rest your foot beside your right hip. Bring your right arm across your body and place it against the inside of your left knee. Push slightly to twist your body until you feel a stretch in your lats and shoulder.
5. Bridge Pose
Purpose: Offers relief from pain caused by the position you are in when training on your bike. Good stretch for your quads, chest, and abs while also strengthening your glutes and hamstrings. You will feel this pose strengthens your back muscles to reduce or prevent pain you may have from running and cycling.
How To: Lie flat on your back with your knees bent with feet on the floor shoulder-width apart. Place hands on either side of your body to help keep yourself balanced. Press your feet and arms firmly into the floor and push your hips up off the ground.
These yoga poses work muscles that are often neglected in the repetitive movements you do while preparing for a triathlon. Get the most out of your training when you add in these 5 yoga poses that are best for triathletes before or after your next workout!
https://captextri.com/wp-content/uploads/2022/02/1255525_CapTex-Refresh-for-Rookie-Tri-Blog-Images-1-4_v3-495x400_120921-copia.jpg400495CapTex Trihttps://captextri.com/wp-content/uploads/2022/05/AS_CAPTEX_LOGO_MOCK-UP_FULL_COLOR-400x197.pngCapTex Tri2022-02-07 12:12:332023-05-04 10:13:265 Must Try Yoga Poses for Triathletes
If you experience knee pain during your training, you’ll want to make some changes to the way you train as well as look into what could be causing the pain. The source of the pain can come from any of the three tri disciplines, so you’ll want to pay close attention to when you feel discomfort to address the problem source. While you do not have to stop training, it’s important to ease up on your training intensity and make some adjustments to the way you train to combat the pain and prevent further harm/damage to your knees. Follow these tips to avoid knee pain during your tri training.
What’s the Problem?
Knee pain is a common problem we hear about in the world of triathlon because you’re training for two sports known to cause knee pain. Best described as pain felt above, below, or behind the kneecap that is caused by overuse or misuse during specific physical activities. Knee pain is very common for triathletes, but most often stems from the incorrect form while running or cycling. It can lead to swelling and even grinding or cracking sounds when doing any physical activity, so it’s best to get to the root of the problem before it’s too late.
Train Without the Pain
Swim
Swimming is the lowest impact on your body in a triathlon. For this reason, it’s the safest alternative to turn to when dealing with knee pain. When hitting the pool for a workout, find a swim stroke style that causes the least amount of discomfort in your knees. Swimming is also an excellent way to alleviate current pain and help you avoid causing any further damage. You can also try focusing on arm-only workouts and use a pull-buoy to avoid making the problem worse.
Bike
Knee pain is typical when riding for extended periods for any athlete. Avoid riding on hilly terrain or unpaved roads to avoid putting too much strain on your knees. Another thing that could be the cause of your knee pain is incorrect bike fit. You can fix this with minor tweaks, like correctly adjusting your saddle height. While this seems minuscule, it impacts your knees much more than you may think. Suppose you are experiencing more pain than usual when out for a ride, this is an indicator to ease up on your training rides. Deal with your current injury to prevent permanent damage.
Run
Typically, running is where athletes feel the most pain and discomfort during training. Running is known to be hard on your joints, but there are ways to reduce this to keep reaching your triathlon goals. An alternative workout for knee pain we recommend is aqua running. If running is especially painful for you, take some time to evaluate your form when you run. Make sure you’re running lightly while maintaining a comfortable stride to avoid heel-striking.
Try training with a group or with a professional coach who can watch your technique and form to help find the source of your problem. It’s always great to have people looking out for you. Plus, you’ll enjoy getting advice from those more familiar to the sport if you are just starting.
When in Doubt, Stretch It Out
Pain in any joint is attributed to the tightness and strength, or lack-there-of, in the muscles around it. This is why flexibility and mobility are so essential to avoid further knee pain. There are a number of knee-specific stretches you can do. Most athletes find the effects of stretching properly essential to dealing with knee pain during training. These stretches almost instantly alleviate knee pain and can be done in front of the tv, or anywhere you’d like. You can also incorporate yoga for triathletes into your training to work on strengthening the knee while increasing your flexibility.
Take a Break When Needed
If you are experiencing extreme knee pain, take some time off when training to prevent causing permanent damage. While this may be tough or feel counteractive, you’ll thank yourself in the long run (pun intended). Pay attention to your body, and take a break if you need to. With the help of these tips, save yourself the trouble and avoid knee pain from happening down the road.
https://captextri.com/wp-content/uploads/2022/01/1255525_CapTex-Refresh-for-Rookie-Tri-Blog-Images-1-4_v4-495x400_120921-copia.jpg400495CapTex Trihttps://captextri.com/wp-content/uploads/2022/05/AS_CAPTEX_LOGO_MOCK-UP_FULL_COLOR-400x197.pngCapTex Tri2022-01-27 10:07:402022-05-11 13:02:34Avoid Knee Pain During Triathlon Training