Posts
When to Wear a Wetsuit
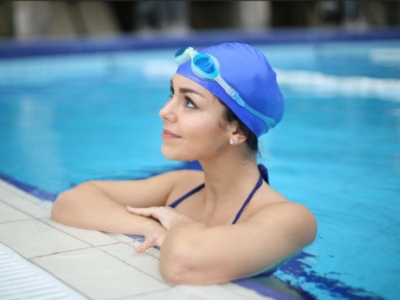
Sometimes because of colder water temperatures, a tri suit is not enough and triathletes will opt to add a wetsuit to wear during the swim. Wearing a wetsuit has many advantages and a few disadvantages, so what are they? When are they helpful or even required? Should I go for a two-piece or one-piece? We created this wetsuit guide to help you make the right decision for your event.
Remember the golden rule: Nothing new on race day. Unless you have an opportunity to swim in the exact wetsuit you will wear on race day at least once before, it is advised to not try something new the day of the race.
Types of wetsuits
A wetsuit is a neoprene insulation suit made for warmth during the swim portion of a triathlon. Triathlon wetsuits are different from other water sports wetsuits and are regulated by governing bodies like USAT. Wetsuits for a triathlon cannot be more the 5mm thick.
The two most common types are sleeved and sleeveless. Full-sleeved wetsuits are better for the coldest water temperatures and are the most efficient. Sleeveless is great for cooler water temperatures but lets in water which can cause drag. Short “jammer” styles have gained in popularity for short-distance triathlons since they are the easiest to put on and take off.
In terms of cost, sleeveless is usually less expensive. Less expensive wetsuits will also typically have uniform neoprene while the materials in high-end suits will vary across the body and incorporate more technology into the fabric.
Remember, you want the fit to be snug, but not restrict breathing or inhibit arm movement.
Why Wear a Wetsuit?
“Free” Speed
Wearing a wetsuit is one of the easiest ways to get faster swim times. The suit allows the wearer to swim faster and reduces the effort the swimmer has to put in. The better the swimmer the less advantage the wetsuit may show. A swimmer can expect to save anywhere from a few seconds to tens of seconds per 100 meters. Usually, the longer the distance the more the savings are noticeable. With less exertion in the water, you will feel less of an energy drain as you are heading up to T1.
Warmth
The wetsuit can provide warmth to the swimmer in the cold water. If you are sensitive to the cold the coverage can be great at making you more comfortable in the water. Wetsuits are highly advised for water temps between 50 to 65 degrees.
Why Not Wear a Wetsuit?
Cost
Wetsuits can be a big investment costing anywhere from just over $100 to almost $1000. You can check with local stores to see if they rent suits or try and find second-hand wetsuits through Facebook groups. It is also important that you take proper care of the wetsuit as the neoprene can degrade over time.
Constricting
Wetsuits should fit snugly without restricting breathing. That said, some people still find them to cause a claustrophobic feeling especially once they start warming up from swimming. Practicing is important so you can see how your body reacts. If you panic or feel uncomfortable in a full sleeve, you might try a sleeveless wetsuit or wetsuit jammers.
Added Time For Taking Off
While they may save you time while swimming, you still have to get out of the wetsuit. This can add minutes to your transition time.
So, to sum it up, for a short swim of a super sprint or sprint triathlon, the time savings of wearing a wetsuit can be negligible. It is really a toss-up to how you feel on race morning and what you have trained for. Pack it in your bag and if it comes time to leave transition and you don’t want to wear it, simply leave it by your bike. For longer distances like an Olympic or Half Distance, a wetsuit will have clear time-saving benefits that outweigh the extra time of removing the suit.
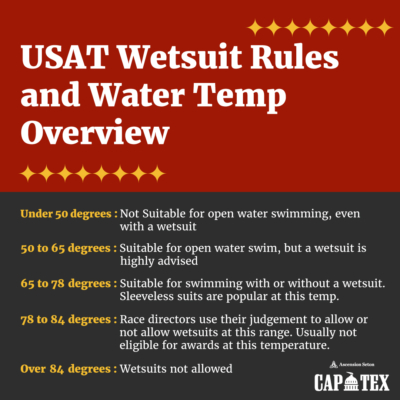
USAT’s Rule on Wetsuits and Water Temperatures
All temps refer to surface water temperatures
Under 50 degrees: Not suitable for open water swimming, even with a wetsuit
50 to 65 degrees: Suitable for open water swim, but a wetsuit is highly advised
65 – 78 degrees: Suitable for swimming with or without a wetsuit. Sleeveless suits are popular at this temp.
78 – 84 degrees: Race directors use their judgment to allow or not allow wetsuits at this range. Usually not eligible for awards at this temperature.
Over 84 degrees: Wetsuits not allowed
Preparing for Open Water: Breathing Drills
You signed up for a triathlon and chances are you are probably doing 99% of your training in a swimming pool. Breathing can be a challenge for many swimmers, which can be exaggerated in open water where conditions may differ. Challenges with open water include turbulence, missing a breath due to waves, running into other swimmers, or starting off the swim too fast before realizing you haven’t taken a breath yet.
You can easily combat a lot of fear of open water swimming through simple drills while training in a swimming pool. Doing breath work will help prepare you for the uncertainties of open water. There is also the added benefit of oxygen capacity which can also help you on the bike and the run.
Our amazing ambassador and swim coach, Trisha Stavinoha, has put together 3 simple workouts that will improve your breathing and have you feeling calm and race-ready.
The“3-5-7”
I like to use this workout to help swimmers relax their breathing, improve their oxygen capacity and prepare them for missing a breath or two.
3-5-7 refers to how many strokes you take between breaths while swimming. This pattern requires you to use bi-lateral breathing.
Bilateral breaking means that you are breathing on both sides of your body. If you breathe only on one side, you can develop overuse injuries and have a lopsided stroke, as well as be more likely to veer to one side. This plus a current can really throw you off course requiring you to sight more which will cause your legs to drop and slow you down.
Bilateral breathing is step one in preparing you for breathing in open water. If you don’t currently breathe bilaterally, now is the time to start. Breathing every 2 strokes is too much and every 4 is not enough over a longer distance.
Here is your lesson…breathe on both sides starting with every three strokes. You will feel awkward the first couple of swims, but the following workouts will help. You can do these workouts as a warm-up or cool down to longer swim sets.
You can print the following workouts and laminate them so you have them by the pool during your swims.
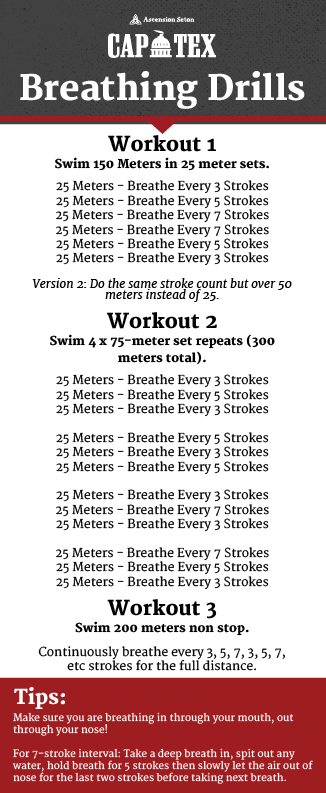
Workout 1
This workout will get you comfortable taking longer times between breaths.
Swim 25 meters breathing every 3 strokes. For the next 25 meters breathe every 5 strokes. Then the next every 7 stokes. Then ladder back down 7, 5, 3 the same way.
Version 2: Do the same stroke count but over 50 meters instead of 25.
150-300 meters total (6 x 25 or 6 x 50).
Workout 2
This workout will help you learn to relax after missing a breath or catching your breath if you started off too fast.
Swim 4 x 75-meter set repeats (300 meters total).
For the first set, You will breathe every 3 strokes for the first 25 meters, then 5 for the second 25 meters, then back down to 3 for the final 25 meters. So we will call this 3, 5, 3 stroke workout. For the following sets, you will do the same but change your breathing pattern accordingly.
The second is every 5, 3, 5 strokes.
The third sight is every 3, 7, 3 strokes
The final set is every 7, 5, 3 strokes.
Workout 3
Continuously breathe every 3, 5, 7, 3, 5, 7, etc strokes for 200 meters non-stop.
If you are not ready for the 7-stroke interval of the workout, not to worry, but keep trying! Make sure you are breathing in through your mouth, out through your nose. When I do the 7-stroke interval I take a deep breath in, spit out any water, hold my breath for 5 strokes then let the air out of my nose for the last two strokes before I breathe in again.
With some practice and dedication, you’ll have these breathing drills mastered in no time, and be ready for the open water at your next triathlon.
Trisha Stavinoha, MS, RD, CSSD, CSCS
Masters Swim Coach
Surge Strength Dryland Coach
Swim Faster with Fins
Use fins during your swim training to become faster in the water
Do you want to improve your kick strength, ankle flexibility, body position, and increase your speed in the water? If you’re thinking, duh, try adding fins to some of your swimming workouts for your upcoming tri! With the right amount of training and the right tools, you’ll be on track to improve your swimming abilities for CapTex Tri in no time.
Why you should use fins
Wearing swim fins increases the amount of resistance your muscles experience as you kick, guaranteeing you’ll put your leg muscles to full use. Stronger legs and the additional strength will carry over into normal swimming when you’re not wearing your fins.
Another benefit of using fins is improved ankle flexibility. This stems from the extra force the fins place on your ankles as you kick. Increased ankle flexibility will result in a more efficient flutter kick through better angles of attack in the water. When you are unable to fully flex your ankles into a streamlined position the ankles remain somewhat bent, catching water instead of propelling the body through it.
Do you have some other new swim equipment? This Rookie Tri blog shows you how to incorporate other swim equipment into your triathlon training.
Technique-focused workout
You’ll want to focus on a slow-motion, over-exaggerated flutter kick. During this workout, focus on slowing down the kick cycle and dramatically increase your range of motion. The over-exaggerated technique allows swimmers to more easily tune into ankle flexion and proper body alignment throughout the kick. As a bonus, this drill is also quite taxing on the legs and core – the increased workload of a large kick also makes for a great strength-building exercise.
2 Rounds
 2 x 25 over-exaggerated flutter kick (with kickboard)
4 x 25 freestyle, easy
2 x 25 over-exaggerated flutter kick (no kickboard)
4 x 25 freestyle, mid-level effort
2 x 25 over-exaggerated flutter kick (with kickboard)
4 x 25 freestyle, easy
Give Aquajogging a Try
Mix up your training routine with some new workouts and give aquajogging a try
What is aquajogging?
Aquajogging is a deep water form of running. Running in the water is great for those who are looking to up their cardiovascular capacity without wear and tear on their muscles from running on pavement.
Aquajogging is sometimes associated with injury but it is also a great addition to any training routine. It is also a great way to escape the heat during the summer months.
What you need to give aquajogging a try
- a pool deep enough so your feet don’t touch the bottom
- An aquajogging flotation belt.
- Waterproof watch if the pool doesn’t have a clock
- water weights (optional)
How to get started
Strap the belt around your waist. You want to make sure the belt stays around your waist and does not ride up too high your ribcage. Once you have your belt on and are in the pool simply get into the running position as you would on land.
Aquajogging is much slower so it is best to base your workouts on time, hence the waterproof watch.
To keep from getting bored run laps up and down the lane. But if you are limited on space you can stay in one spot or jog in small circles. You can increase the difficulty of the workout by increasing your cadence.
Some advice from experience
Stay conscious of your form, make sure your arms don’t turn into a doggy paddle.
Don’t lean forward. You need to keep your body as upright as possible. So remember to check in on yourself.
Bring your knees up higher than you would on land.
Don’t overdo it on your first session. 20 – 30 minutes is a good Aqua jogging session to start out with.
Remember, this is not just treading water.
Aquajogging is as hard as you want to make it. If you find yourself slacking, do interval workouts.