Posts

What to Eat and When During a Triathlon

This post was originally published on https://zone3.us/blogs/blog/what-to-eat-and-when-to-eat-during-a-triathlon

By Glen Gore, former pro triathlete and current coach.


If ever there was a hot topic of debate, it comes in the form of triathlon nutrition and more importantly, nutrition intake on race days.

What exactly do you need to eat and drink, and when?

To start this editorial piece, we need to agree that there is no magic formula that will work the same for everyone. Each of us differs in our body mechanics and the way we work with nutritional absorption that it’s almost impossible to pinpoint one clear plan that will work for everyone.

Having said that, you can still use sound advice and at least start on the right track. For us, nutrition is another important discipline in the sport of triathlon. The fastest and most finely tuned sports car in the world will go nowhere fast if there is no fuel in the tank. Similarly no matter how hard you have trained and prepared if you are going to race on zero nutrition, your body (engine) is going to slowly come to a complete stop and falter.

Rule no 1 – don’t neglect your nutritional intake on race days. It’s quite easy to “forget” to drink and eat when you are giving 100% during an all-out race effort. Just know that sooner or later, you will start to run out of energy stores and that is when racing becomes anything but fun.
Fuelling is different depending on the distance

A Sprint Distance triathlon race is completely different from an Olympic, Half, or full Ironman distance event. These distances require different amounts of training loads to be fully prepared to take on the challenge. The same rule applies to how you fuel the body during an event that takes less than 60 mins compared to an event that may take up to 17hrs.

Sprint

A sprint race normally lasts anywhere between 52 minutes for the PRO’s up to say 1.5-2hrs for the backmarkers. Most of the time – depending on weather conditions, you can get away with next to nothing in the form of intake over the sprint distance. Some hydration via a small sports bottle and perhaps 1-2 gels for the bike and run should sufficiently see you through the event.

I have often found that my best results over the sprint distance come when I go in “light” – not much food in the tank – that empty feeling but with just enough energy stores from the previous night’s meal or early morning small breakfast to see me through the event.

Hydration is always important – you never want to start any event “thirsty” so make sure the fluid levels are topped up in the form of small sips. A huge intake of fluids just before the start is not a suggested best practice for an optimum result over short distances. 

These should be taken as pure guidelines and not as hard-fast rules – these suggestions come from trial and error on the battlefield.

Olympic

When you compete in an event that spans longer than 2hrs, then you need to start looking at a more efficient fueling system.

The Olympic distance event can take anywhere from 2hrs to 3hrs plus – eating and drinking now becomes more important. If you are not fuelling adequately over the 40km cycle, you will feel the burn when you enter the hunt on the 10km run.

Some athletes require less nutritional intake than others while others may require more fluid intake. The best place to learn what your body requires is by trial and error. The more you race over this distance, the more you will learn as to what you require and when. 

Half-Distance

When the event time spans over 4hrs in duration right up to 8h30, then you will need a tried and tested method, worked on in training, to see you adequately fuelled in a race that covers a whopping 113km.

The many trained brick sessions will give you a firm indication of what will work for you on race day and what will not. It does become quite expensive when your training sessions have to mimic race days but as the saying goes, practice makes perfect. The more you practice eating and drinking over the longer distances in training, the easier the transition will be from training days to half-distance racing days.

Full IM Distance

So many athletes have “bonked” or “hit the wall” over the full IM distance simply because they ran out of fuel. The body was prepared, the mental side was in place but the “engine” for some reason was neglected.

Firstly consider that a normal day at work would require someone to eat breakfast, lunch, and dinner. Now add in 3.8km of swimming, 180km of biking, and a 42.2km marathon to top it all off, covered in a time that may span at least 17hrs. Now it becomes apparent just how much food and drink is required to keep you moving along at an optimum level.
Best Fuelling Tactics during Training

  • Find a product that works and more importantly is cost-effective. Just because it’s expensive does not mean it’s better.
  • Trial and Error – the brick session will help you develop a suitable war plan for race days. If it works in training, more than likely it will work during the race.
  • Make sure you re-fuel within 15-30 minutes after a strenuous workout. As athletes, we often neglect the post-training refueling strategy. Remember you are not only eating for today but you are eating for tomorrow’s training session as well.

Best Fuelling Tactics during Racing

  • Eat small bits and drink small sips all the time – especially during the longer races – the reason being to keep the tank on full at all times and not deplete it before you think about replenishing. 
  • Cut up your energy bars into small bite-size pieces – this is much easier to eat and digest while on the move.
  • Get in some solid food sources quickly once you are done with the swim. The longer the duration of the event, the more advisable to start the cycle with something a little more substantial than just a gel.
  • Don’t overload your bike with too much nutrition and hydration. This makes that very expensive bike extremely heavy. The bigger races have more than an ample supply of nutrition along the way – make use of it even if you need to stop briefly and take some on-board.
  • Don’t start the run in a hurry. T2 over long distances is a time where you need to relax a little and consume some solid nutrition before you head out onto the run. Whatever time you lose in transition you will more than makeup, especially when the run distance is over a full standard marathon.

Common Fuelling Mistakes

  • Eating only when hungry – this means it’s already too late. It will take you a long time to get back those lost energy stores, time which you won’t have during the race days.
  • Drinking only when thirsty. Once again, this is too late – if you are feeling thirsty you are already on the way to partial dehydration. Keep on sipping water and juice so you never get to feel that thirst.
  • Trying new stuff on race day. Stick to what you know and what you have trained on.
  • Don’t alter the nutritional plan. What you practiced in training, do the same on race day. Don’t change the formula, there is a good chance it won’t work.
  • Drinking too much. This can be a problem worse than drinking too little so take the race weather conditions on the day into account and drink what is normal for you.

Nutrition is important, a successful race plan always has a well thought out nutritional plan that goes along with it, and remember, it takes trial and error to perfect – good luck!

Click here to shop ZONE3.

When to Wear a Wetsuit

Sometimes because of colder water temperatures, a tri suit is not enough and triathletes will opt to add a wetsuit to wear during the swim. Wearing a wetsuit has many advantages and a few disadvantages, so what are they? When are they helpful or even required? Should I go for a two-piece or one-piece? We created this wetsuit guide to help you make the right decision for your event.

Remember the golden rule: Nothing new on race day. Unless you have an opportunity to swim in the exact wetsuit you will wear on race day at least once before, it is advised to not try something new the day of the race. 

Types of wetsuits

A wetsuit is a neoprene insulation suit made for warmth during the swim portion of a triathlon. Triathlon wetsuits are different from other water sports wetsuits and are regulated by governing bodies like USAT. Wetsuits for a triathlon cannot be more the 5mm thick.

The two most common types are sleeved and sleeveless. Full-sleeved wetsuits are better for the coldest water temperatures and are the most efficient. Sleeveless is great for cooler water temperatures but lets in water which can cause drag. Short “jammer” styles have gained in popularity for short-distance triathlons since they are the easiest to put on and take off.

In terms of cost, sleeveless is usually less expensive. Less expensive wetsuits will also typically have uniform neoprene while the materials in high-end suits will vary across the body and incorporate more technology into the fabric.

Remember, you want the fit to be snug, but not restrict breathing or inhibit arm movement.

Why Wear a Wetsuit?

“Free” Speed

Wearing a wetsuit is one of the easiest ways to get faster swim times. The suit allows the wearer to swim faster and reduces the effort the swimmer has to put in. The better the swimmer the less advantage the wetsuit may show. A swimmer can expect to save anywhere from a few seconds to tens of seconds per 100 meters. Usually, the longer the distance the more the savings are noticeable. With less exertion in the water, you will feel less of an energy drain as you are heading up to T1.

Warmth

The wetsuit can provide warmth to the swimmer in the cold water. If you are sensitive to the cold the coverage can be great at making you more comfortable in the water. Wetsuits are highly advised for water temps between 50 to 65 degrees.

Why Not Wear a Wetsuit?

Cost

Wetsuits can be a big investment costing anywhere from just over $100 to almost $1000. You can check with local stores to see if they rent suits or try and find second-hand wetsuits through Facebook groups. It is also important that you take proper care of the wetsuit as the neoprene can degrade over time.

Constricting

Wetsuits should fit snugly without restricting breathing. That said, some people still find them to cause a claustrophobic feeling especially once they start warming up from swimming. Practicing is important so you can see how your body reacts. If you panic or feel uncomfortable in a full sleeve, you might try a sleeveless wetsuit or wetsuit jammers.

Added Time For Taking Off

While they may save you time while swimming, you still have to get out of the wetsuit. This can add minutes to your transition time.

So, to sum it up, for a short swim of a super sprint or sprint triathlon, the time savings of wearing a wetsuit can be negligible. It is really a toss-up to how you feel on race morning and what you have trained for. Pack it in your bag and if it comes time to leave transition and you don’t want to wear it, simply leave it by your bike. For longer distances like an Olympic or Half Distance, a wetsuit will have clear time-saving benefits that outweigh the extra time of removing the suit.

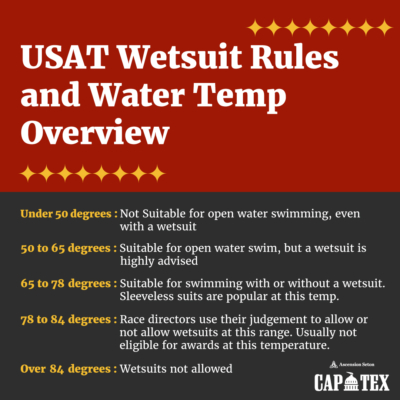
USAT’s Rule on Wetsuits and Water Temperatures

All temps refer to surface water temperatures

Under 50 degrees: Not suitable for open water swimming, even with a wetsuit

50 to 65 degrees: Suitable for open water swim, but a wetsuit is highly advised

65 – 78 degrees: Suitable for swimming with or without a wetsuit. Sleeveless suits are popular at this temp.

78 – 84 degrees: Race directors use their judgment to allow or not allow wetsuits at this range. Usually not eligible for awards at this temperature.

Over 84 degrees: Wetsuits not allowed

Preparing for Open Water: Breathing Drills

You signed up for a triathlon and chances are you are probably doing 99% of your training in a swimming pool.  Breathing can be a challenge for many swimmers, which can be exaggerated in open water where conditions may differ.  Challenges with open water include turbulence, missing a breath due to waves, running into other swimmers, or starting off the swim too fast before realizing you haven’t taken a breath yet.  

You can easily combat a lot of fear of open water swimming through simple drills while training in a swimming pool. Doing breath work will help prepare you for the uncertainties of open water. There is also the added benefit of oxygen capacity which can also help you on the bike and the run.

Our amazing ambassador and swim coach, Trisha Stavinoha, has put together 3 simple workouts that will improve your breathing and have you feeling calm and race-ready. 

The“3-5-7”

I like to use this workout to help swimmers relax their breathing, improve their oxygen capacity and prepare them for missing a breath or two.  

3-5-7 refers to how many strokes you take between breaths while swimming. This pattern requires you to use bi-lateral breathing.

Bilateral breaking means that you are breathing on both sides of your body. If you breathe only on one side, you can develop overuse injuries and have a lopsided stroke, as well as be more likely to veer to one side. This plus a current can really throw you off course requiring you to sight more which will cause your legs to drop and slow you down.  

Bilateral breathing is step one in preparing you for breathing in open water.  If you don’t currently breathe bilaterally, now is the time to start. Breathing every 2 strokes is too much and every 4 is not enough over a longer distance.

Here is your lesson…breathe on both sides starting with every three strokes. You will feel awkward the first couple of swims, but the following workouts will help.  You can do these workouts as a warm-up or cool down to longer swim sets.

You can print the following workouts and laminate them so you have them by the pool during your swims.

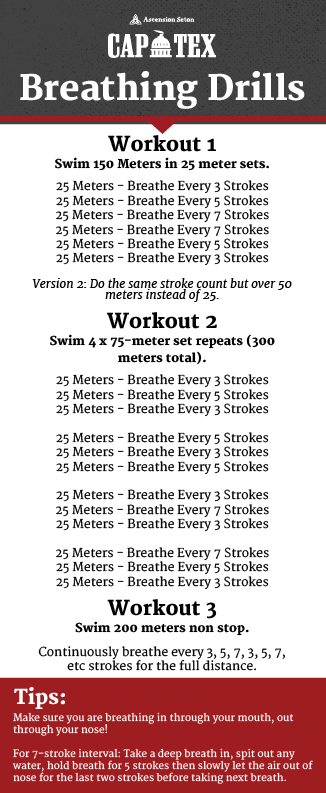
Workout 1

This workout will get you comfortable taking longer times between breaths.

Swim 25 meters breathing every 3 strokes. For the next 25 meters breathe every 5 strokes. Then the next every 7 stokes. Then ladder back down 7, 5, 3 the same way. 

Version 2: Do the same stroke count but over 50 meters instead of 25.

150-300 meters total (6 x 25 or 6 x 50).

Workout 2

This workout will help you learn to relax after missing a breath or catching your breath if you started off too fast.

Swim 4 x 75-meter set repeats (300 meters total).

For the first set, You will breathe every 3 strokes for the first 25 meters, then 5 for the second 25 meters, then back down to 3 for the final 25 meters. So we will call this 3, 5, 3 stroke workout. For the following sets, you will do the same but change your breathing pattern accordingly. 

The second is every 5, 3, 5 strokes.

The third sight is every 3, 7, 3 strokes

The final set is every 7, 5, 3 strokes. 

Workout 3

Continuously breathe every 3, 5, 7, 3, 5, 7, etc strokes for 200 meters non-stop. 

If you are not ready for the 7-stroke interval of the workout, not to worry, but keep trying!  Make sure you are breathing in through your mouth, out through your nose.  When I do the 7-stroke interval I take a deep breath in, spit out any water, hold my breath for 5 strokes then let the air out of my nose for the last two strokes before I breathe in again.  

With some practice and dedication, you’ll have these breathing drills mastered in no time, and be ready for the open water at your next triathlon. 


Trisha Stavinoha, MS, RD, CSSD, CSCS

Masters Swim Coach

Surge Strength Dryland Coach 

6 Best Places to Train in Austin

Here is a list of what we think are the 6 best places to train in Austin. We broke them down by favorite spots to swim, bike, and run. These are great for all levels of triathletes.

Swim

1.Big Stacy

Tucked back in one of Austin’s oldest neighborhoods, this pool has been keeping Austinites of all ages cool and entertained since the 1930s.  The best part is it is free to use year-round, with the added bonus of being heated during the winter months. There are a limited number of lanes so be prepared to share or come during non-peak hours.


2.Barton Springs Pool

Constructed in 1940, it has been a summer staple for many years and is known for being Austin’s no. 1 natural pool.  It’s easy to see why.  The 3-acre, spring-fed pool remains 68°F degrees year-round, making it a refreshing way to shake the heat. It is also a great way to practice open water swimming and swimming in a wetsuit. Get there as early as 5 am on weekdays to swim without the crowds.

Bike


1. South Walnut Creek Trail

The Southern Walnut Creek Trail is Austin’s first Urban Trail. Not a car in sight!  The trail is open for public use and begins at Govalle Park and ends in the vicinity of Johnny Morris Road and Daffen Lane. The trail is approximately 7.3 miles in length and consists of a 10′ wide concrete trail with 2′ shoulders. There are several creek crossings and trailheads on the trail. The lush surroundings can make seeing around corners difficult at times so this is not a great place for a speed workout.


2. Veloway

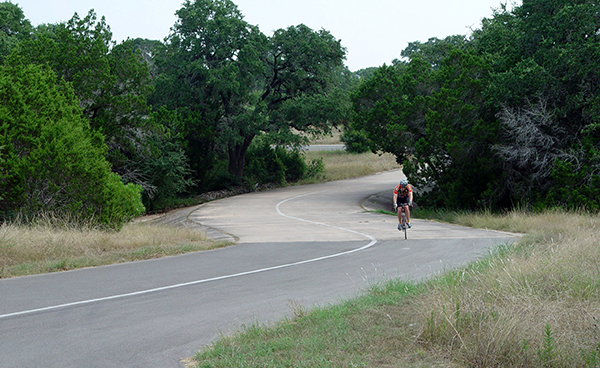
The Veloway at Circle C Ranch Metropolitan Park was constructed in the early ’90s and was the first facility of its kind in the United States.  The Veloway is a 23’ wide, 3.1 miles (5K) long bicycle tract that traverses the natural terrain.   People travel from all over the metropolitan region to cycle here on a daily basis. This path is great because it is for cycling and inline skating only. Still, be on the lookout for the rogue walker or slower cyclist, slower traffic keep to the right and always pass on the left.

Run

1.Violet Crown

After years of strategic land acquisition and planning, the first six-mile segment is now open and the VCT is on its way to becoming the longest trail of its kind in Central Texas. Once complete, the 30-mile trail will provide a unique recreational experience as it passes through the urban wildlands of the Barton Creek Wilderness Park, the City of Sunset Valley, and eventually into Hays County. Be sure to bring your own water and prepare for off-road bathroom situations as there are no water fountains or bathrooms on the trail.


2. Ann and Roy Butler Hike and Bike Trail at Lady Bird Lake

The go-to spot in Austin. The urban path meanders along the water’s edge and passes by skyscrapers, neighborhoods, ball fields, and cultural attractions. With the completion of the Boardwalk portion of the Trail in June 2014, the trail no offers a full 10-mile loop. The different street crossings at Lamar, 1st Street, and Congress make scenic and convenient crossovers for making this distance you are looking for. With more than 1.5 million visits a year, the 10-mile trail is Austin’s most recognized and popular recreational area.

Importance of Warming Up and Cooling Down

Warm-Up and Cool Down: The Basics

We know that each workout should start with a warm-up and end with a cool-down, but more often than not, athletes tend to skip one or both. Especially when pressed for time. Not incorporating a warm-up and cool-down into your training can be detrimental to your overall performance when it comes time for race day. While also puts you at the disadvantage of a much higher risk of injury. Just like giving your car time to warm up before cruising at 65 mph, your body needs this time to get in a higher gear for more intense workouts or fitness activities. Keep reading to know the importance of warming up and cooling down during your CapTex Tri training.

Why You Should Warm-Up

A warm-up before a training session or race is essential for preparing your body and mind for a workout session. The main point of a warm-up is to increase your body core temperature and muscles. Warming up will not only help you to perform better, but it will also protect your body from injury. A good warm-up gets your blood flowing and gives you a chance to get energized for the rest of your session. It also helps increase the range of motion to your joints and muscles, which should allow your muscles to feel less stressed and stiff when you start. A dynamic warmup should aim to increase blood flow to the areas which will be working and to wake up the nervous system throughout the body.

A guideline to a general warm-up routine would include:

Jogging, biking, etc. for about 5 minutes to just get your blood flowing and get those muscles and joints moving. You want to work at a comfortable pace that’s easy to moderate. For the bike, a good warm-up should consist of five to 10 minutes of easy spinning, and then slowly increasing to the gear you wish to complete your session in. This really helps “open up” your body before getting into the more strenuous part of your workout.

Why You Should Cool-Down

Don’t come to an abrupt stop when completing your exercise, especially if it has been high intensity. Instead, you should cool-down by exercising at a lower intensity than the main session to bring your body temp and heart rate back down to pre-exercise levels. The cool-down should last around five to 10 minutes no matter what discipline you are training for that day. Cooling down helps to gradually decrease your heart rate and get rid of the metabolic waste from your muscles.
Mentally, cooling down also allows you some space to reflect on your performance and gives you some time to set you up for the rest of the day. Don’t underestimate the importance of this! Pro tip: Add some stretches to your cool down while your muscles are warmed up for one of the best ways to improve your overall flexibility and mobility while also reducing post-workout pain.

Bottom Line

Group Warming Up and Cooling DownAdding a warm-up and cool down into your fitness routine is a simple, yet proven way to maximize your benefits when working out. The warm-up gives your body a chance to prepare for your session while the cool-down then helps you focus on slowing your breathing and return to your normal heart rate. Rather than seeing it as an optional part of your workout, think of warming up and cooling down as part of your session to get the most out of all the hard work you’ve put in!
Swim Faster with Fins

Use fins during your swim training to become faster in the water

Do you want to improve your kick strength, ankle flexibility, body position, and increase your speed in the water? If you’re thinking, duh, try adding fins to some of your swimming workouts for your upcoming tri! With the right amount of training and the right tools, you’ll be on track to improve your swimming abilities for CapTex Tri in no time.

Why you should use fins

Wearing swim fins increases the amount of resistance your muscles experience as you kick, guaranteeing you’ll put your leg muscles to full use. Stronger legs and the additional strength will carry over into normal swimming when you’re not wearing your fins.use fins to become faster in the water.

Another benefit of using fins is improved ankle flexibility. This stems from the extra force the fins place on your ankles as you kick. Increased ankle flexibility will result in a more efficient flutter kick through better angles of attack in the water. When you are unable to fully flex your ankles into a streamlined position the ankles remain somewhat bent, catching water instead of propelling the body through it.

Do you have some other new swim equipment? This Rookie Tri blog shows you how to incorporate other swim equipment into your triathlon training.

Technique-focused workout

You’ll want to focus on a slow-motion, over-exaggerated flutter kick. During this workout, focus on slowing down the kick cycle and dramatically increase your range of motion. The over-exaggerated technique allows swimmers to more easily tune into ankle flexion and proper body alignment throughout the kick. As a bonus, this drill is also quite taxing on the legs and core – the increased workload of a large kick also makes for a great strength-building exercise.

2 Rounds

use fins to become faster in the water2 x 25 over-exaggerated flutter kick (with kickboard)
4 x 25 freestyle, easy
2 x 25 over-exaggerated flutter kick (no kickboard)
4 x 25 freestyle, mid-level effort
2 x 25 over-exaggerated flutter kick (with kickboard)
4 x 25 freestyle, easy

Essential Race Day Skills You Need to Know for Your Upcoming Tri

Leave no room for surprises during your upcoming tri with these essential race day skills you need to know

Despite all the planning and prepping to make the morning of your tri go perfectly, we all know that some things are out of our control. Expected the unexpected and prepare yourself by mastering these essential race day skills to handle whatever comes your way on race day.

How to Fix a Dropped Chain

6 skills to know before race day

Get off the bike and steady it in an upright position against something sturdy. To add slack to the chain, push the rear derailleur toward the pedal (forward or inward), and then use your other hand to free the chain from the chainrings or pedals. Line the chain back up with a chainring and cassette to put the chain back in place. Lastly, lift the rear of your bike a few inches of the ground and give the pedals a few turns to allow the chain to find its gear. This seems insignificant, but it’s an important step to keep your chain from more wear and tear throughout the rest of your ride.

How to Ride in the Rain

Check the weather on race morning to see if you should be prepared to ride in the rain. Throughout the course, avoid standing water. You never know what could be underneath a puddle, and you don’t want to risk a flat tire in wet conditions. Also, be on the lookout for rainbow-colored oil patches to avoid slipping. Stay within your comfort zone, and take your time and be cautious around corners to prevent losing control. Last but not least, bring some protection for your eyes! Hopefully, you do this when out for any ride, but you will be glad you did in the case of riding in the rain.

How to Ride While Taking a Drink

You’re bound to get thirsty during the bike portion, so be prepared to ride with one hand during a race. Practice makes perfect. During your training, practice this race day skill by removing one hand at a time to build up your confidence. Start with shorter distances, and before you know it you’ll be pro at riding with one hand. This will allow you to eat, drink and signal to other riders while making your way to the finish line.

How to Sight in the Water

To avoid swimming a further distance during your tri, sighting is an essential race day skill you should practice before an open-water swim. You need to look where you’re going every few strokes to make sure you are staying within the buoys. The best method of sighting is to incorporate glancing forward before you go to take a breath. It is recommended to sight every 2 – 3 strokes, but in order to find what works best for you, you will just have to practice. Pro tip: Look at the swim course before-hand to see if the course goes clockwise or counter-clockwise, then you’ll know to stay on the right or left side of the buoys.
How to Look Over Your Shoulder on the Bike

Once you perfect riding with one hand, you’ll be ready to look over your shoulder during your ride. It’s important to be aware of your surroundings during a ride to keep yourself, and others around you safe. It’s all about shifting your weight correctly and keeping your knees, pelvis, and front-wheel facing forward. We advise performing this drill in a parking lot, or on an empty street to make sure you can still ride straight while turned around.

How to Change a Flat

Follow these 10 simple steps to fix a flat, and you’ll be back in the race in no time.

1. Pull over and find a safe place off the road to change tire
2. Remove the wheel from the bike.
3. Remove the tire with levers from the wheel
4. Check your tire for large punctures or sharp items
5. Check the rim of the wheel for anything that might have punctured through the rim tape
6. Pop one side of the tire back over the rim of the wheel
7. Put the new tube back inside tire
8. Push the free tire wall back onto the rim
9. Inflate the new tube.
10. Put the wheel back on the bike.

Once you’ve conquered these essential race day skills you need to know for your upcoming tri, there will be nothing in your way as you head for the finish line!

Give Aquajogging a Try

Mix up your training routine with some new workouts and give aquajogging a try

What is aquajogging?

Aquajogging is a deep water form of running. Running in the water is great for those who are looking to up their cardiovascular capacity without wear and tear on their muscles from running on pavement.

Aquajogging is sometimes associated with injury but it is also a great addition to any training routine. It is also a great way to escape the heat during the summer months.

What you need to give aquajogging a try

How to get started

Give Aquajogging a Try

Strap the belt around your waist. You want to make sure the belt stays around your waist and does not ride up too high your ribcage. Once you have your belt on and are in the pool simply get into the running position as you would on land.

Aquajogging is much slower so it is best to base your workouts on time, hence the waterproof watch.

To keep from getting bored run laps up and down the lane. But if you are limited on space you can stay in one spot or jog in small circles. You can increase the difficulty of the workout by increasing your cadence. 

Some advice from experience

Stay conscious of your form, make sure your arms don’t turn into a doggy paddle.

Don’t lean forward. You need to keep your body as upright as possible. So remember to check in on yourself.

Bring your knees up higher than you would on land.

Don’t overdo it on your first session. 20 – 30 minutes is a good Aqua jogging session to start out with.

Remember, this is not just treading water.

Aquajogging is as hard as you want to make it. If you find yourself slacking, do interval workouts.