Posts

When to Wear a Wetsuit

Sometimes because of colder water temperatures, a tri suit is not enough and triathletes will opt to add a wetsuit to wear during the swim. Wearing a wetsuit has many advantages and a few disadvantages, so what are they? When are they helpful or even required? Should I go for a two-piece or one-piece? We created this wetsuit guide to help you make the right decision for your event.

Remember the golden rule: Nothing new on race day. Unless you have an opportunity to swim in the exact wetsuit you will wear on race day at least once before, it is advised to not try something new the day of the race. 

Types of wetsuits

A wetsuit is a neoprene insulation suit made for warmth during the swim portion of a triathlon. Triathlon wetsuits are different from other water sports wetsuits and are regulated by governing bodies like USAT. Wetsuits for a triathlon cannot be more the 5mm thick.

The two most common types are sleeved and sleeveless. Full-sleeved wetsuits are better for the coldest water temperatures and are the most efficient. Sleeveless is great for cooler water temperatures but lets in water which can cause drag. Short “jammer” styles have gained in popularity for short-distance triathlons since they are the easiest to put on and take off.

In terms of cost, sleeveless is usually less expensive. Less expensive wetsuits will also typically have uniform neoprene while the materials in high-end suits will vary across the body and incorporate more technology into the fabric.

Remember, you want the fit to be snug, but not restrict breathing or inhibit arm movement.

Why Wear a Wetsuit?

“Free” Speed

Wearing a wetsuit is one of the easiest ways to get faster swim times. The suit allows the wearer to swim faster and reduces the effort the swimmer has to put in. The better the swimmer the less advantage the wetsuit may show. A swimmer can expect to save anywhere from a few seconds to tens of seconds per 100 meters. Usually, the longer the distance the more the savings are noticeable. With less exertion in the water, you will feel less of an energy drain as you are heading up to T1.

Warmth

The wetsuit can provide warmth to the swimmer in the cold water. If you are sensitive to the cold the coverage can be great at making you more comfortable in the water. Wetsuits are highly advised for water temps between 50 to 65 degrees.

Why Not Wear a Wetsuit?

Cost

Wetsuits can be a big investment costing anywhere from just over $100 to almost $1000. You can check with local stores to see if they rent suits or try and find second-hand wetsuits through Facebook groups. It is also important that you take proper care of the wetsuit as the neoprene can degrade over time.

Constricting

Wetsuits should fit snugly without restricting breathing. That said, some people still find them to cause a claustrophobic feeling especially once they start warming up from swimming. Practicing is important so you can see how your body reacts. If you panic or feel uncomfortable in a full sleeve, you might try a sleeveless wetsuit or wetsuit jammers.

Added Time For Taking Off

While they may save you time while swimming, you still have to get out of the wetsuit. This can add minutes to your transition time.

So, to sum it up, for a short swim of a super sprint or sprint triathlon, the time savings of wearing a wetsuit can be negligible. It is really a toss-up to how you feel on race morning and what you have trained for. Pack it in your bag and if it comes time to leave transition and you don’t want to wear it, simply leave it by your bike. For longer distances like an Olympic or Half Distance, a wetsuit will have clear time-saving benefits that outweigh the extra time of removing the suit.

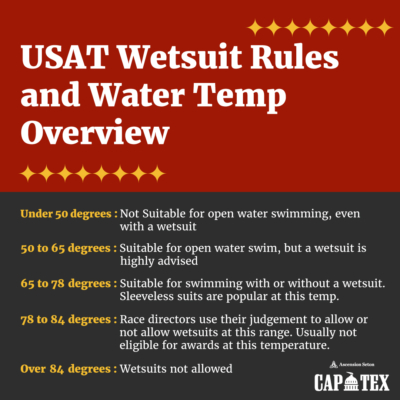
USAT’s Rule on Wetsuits and Water Temperatures

All temps refer to surface water temperatures

Under 50 degrees: Not suitable for open water swimming, even with a wetsuit

50 to 65 degrees: Suitable for open water swim, but a wetsuit is highly advised

65 – 78 degrees: Suitable for swimming with or without a wetsuit. Sleeveless suits are popular at this temp.

78 – 84 degrees: Race directors use their judgment to allow or not allow wetsuits at this range. Usually not eligible for awards at this temperature.

Over 84 degrees: Wetsuits not allowed
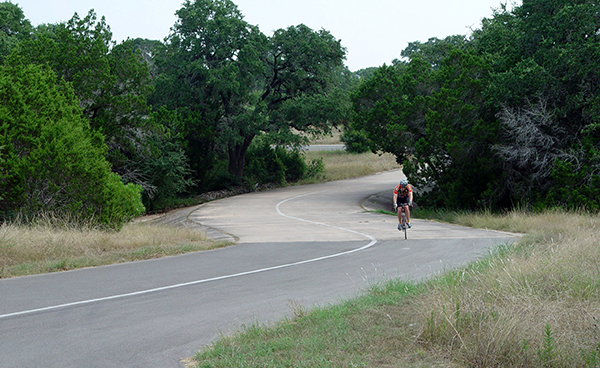
How Can I Speed Up My Triathlon Transitions?

A triathlon is a competition with three sports, which means there are two points in the race where you must transition from one sport to the next. It can take a lot of practice to get good at transitioning between the sports, but there are things you can do to make it faster!

We made a list of some simple strategies can that can help you speed up your triathlon transitions.


Visualize a Plan & Practice on it

Triathletes should be ready with a plan and train themselves accordingly beforehand. You should practice rigorously and leave no room for error. Learning to execute the plan perfectly will enable you to have quick transitions.

Getting the Wetsuit Off Faster

Applying a lubricant to your body before putting on the wetsuit will enable you to slide out of it easily during the first transition. Locating the zip cord quickly and kicking off the suit as soon as possible saves a lot of time.

Only the Essentials

Take things that are absolutely essential. Skipping unnecessary items reduces the number of tasks to be done and saves time.

Be Quick With the Helmet

Your helmet should be kept unfastened prior to the race. Make proper adjustments so that it fits your head and can be removed comfortably. Train yourself to secure the helmet on your head as quickly as possible.

Use This Bike Shoe Trick

Fastening your shoes to the pedals of your bike expedites the process of transition. Thin rubber bands can be used for this purpose. Keep the shoes fully loosened so that you can sit on the bike and put them on swiftly. 

Running With the Bike

In the transition zone between swimming and cycling, you are not allowed to ride your bike. Practice running safely and smoothly while holding your bike. By clearing this distance quickly you can deduct some seconds from your overall timing.

Putting on the Running Shoes

You can sprinkle some talcum powder on your running shoes to facilitate a smooth entry of your feet into the shoes. Swap your ordinary shoelaces with speed laces or lace locks.

Maintain Balance

Some of these strategies like wearing shoes while sitting on the bike may seem a little difficult to achieve. But proper training can help you achieve the perfect balance. Along with quick execution, steadiness is also important. Do not move too fast, maintain proper balance.

Study the Racetrack Properly

Have the map of the racetrack in your mind. Repeatedly play the whole scenario in your imagination and prepare yourself to take the right step at the right time.


Training your body and mind for faster triathlon transitions gives you an edge over others, which is why triathletes should incorporate transition practice and the suggestions above into their tri training sessions. 

Preparing for Open Water: Breathing Drills

You signed up for a triathlon and chances are you are probably doing 99% of your training in a swimming pool.  Breathing can be a challenge for many swimmers, which can be exaggerated in open water where conditions may differ.  Challenges with open water include turbulence, missing a breath due to waves, running into other swimmers, or starting off the swim too fast before realizing you haven’t taken a breath yet.  

You can easily combat a lot of fear of open water swimming through simple drills while training in a swimming pool. Doing breath work will help prepare you for the uncertainties of open water. There is also the added benefit of oxygen capacity which can also help you on the bike and the run.

Our amazing ambassador and swim coach, Trisha Stavinoha, has put together 3 simple workouts that will improve your breathing and have you feeling calm and race-ready. 

The“3-5-7”

I like to use this workout to help swimmers relax their breathing, improve their oxygen capacity and prepare them for missing a breath or two.  

3-5-7 refers to how many strokes you take between breaths while swimming. This pattern requires you to use bi-lateral breathing.

Bilateral breaking means that you are breathing on both sides of your body. If you breathe only on one side, you can develop overuse injuries and have a lopsided stroke, as well as be more likely to veer to one side. This plus a current can really throw you off course requiring you to sight more which will cause your legs to drop and slow you down.  

Bilateral breathing is step one in preparing you for breathing in open water.  If you don’t currently breathe bilaterally, now is the time to start. Breathing every 2 strokes is too much and every 4 is not enough over a longer distance.

Here is your lesson…breathe on both sides starting with every three strokes. You will feel awkward the first couple of swims, but the following workouts will help.  You can do these workouts as a warm-up or cool down to longer swim sets.

You can print the following workouts and laminate them so you have them by the pool during your swims.

Workout 1

This workout will get you comfortable taking longer times between breaths.

Swim 25 meters breathing every 3 strokes. For the next 25 meters breathe every 5 strokes. Then the next every 7 stokes. Then ladder back down 7, 5, 3 the same way. 

Version 2: Do the same stroke count but over 50 meters instead of 25.

150-300 meters total (6 x 25 or 6 x 50).

Workout 2

This workout will help you learn to relax after missing a breath or catching your breath if you started off too fast.

Swim 4 x 75-meter set repeats (300 meters total).

For the first set, You will breathe every 3 strokes for the first 25 meters, then 5 for the second 25 meters, then back down to 3 for the final 25 meters. So we will call this 3, 5, 3 stroke workout. For the following sets, you will do the same but change your breathing pattern accordingly. 

The second is every 5, 3, 5 strokes.

The third sight is every 3, 7, 3 strokes

The final set is every 7, 5, 3 strokes. 

Workout 3

Continuously breathe every 3, 5, 7, 3, 5, 7, etc strokes for 200 meters non-stop. 

If you are not ready for the 7-stroke interval of the workout, not to worry, but keep trying!  Make sure you are breathing in through your mouth, out through your nose.  When I do the 7-stroke interval I take a deep breath in, spit out any water, hold my breath for 5 strokes then let the air out of my nose for the last two strokes before I breathe in again.  

With some practice and dedication, you’ll have these breathing drills mastered in no time, and be ready for the open water at your next triathlon. 


Trisha Stavinoha, MS, RD, CSSD, CSCS

Masters Swim Coach

Surge Strength Dryland Coach 

Incorporate Mindfulness Into Your Training

Whether you’re training to be faster or are simply exercising to relax and destress, practicing mindfulness during your physical activities in order to better connect with your body is a great way to achieve a balanced state of mind and find joy in your training.

Often when we hear the word ‘mindfulness’ or ‘meditation’, we envision someone sitting on a yoga mat by the beach, practicing slow and thoughtful movements. But a mindful state can and should be achieved through any activity, especially in triathlon training.


What Do We Mean When We Say Mindfulness?

The simplest definition is the practice of being aware and present at the moment. When it comes to training it means we are being mentally connected to our bodies and train our minds and bodies together as one unit. When we only focus on our physical self without also training the mind, we can create a disconnect between the two, causing negative thoughts and a higher perceived exertion during an event.

Why is Mindfulness Important?

Mindfulness has been shown to help improve focus, decrease stress levels, and increase self-awareness. If you’re looking for a way to improve your performance, incorporating mindfulness into your training is definitely something you should consider. With mindfulness, you can learn how to be more patient, focused, and relaxed during physical activity- leading to better results overall.

How to Incorporate Mindfulness

1) Slow Down

Endurance activities are actually very conducive to achieving a meditative state of mind, and it starts with slowing down and focusing on your form. It’s important to be precise during swimming strokes and land lightly when running so that you can move more efficiently–don’t get frustrated if thoughts wander off while doing this! When we catch ourselves thinking about something else, just relax and refocus back onto the specific element of our movement.

2) Remember Your Goals

Also helpful while practicing mindfulness during workouts, is to have a goal for your workout and keep it top of mind. Maybe today’s goal is to add an extra mile on your run, or maybe it’s to focus on getting your core stronger. Whatever your reason may be for doing your workout, keep it locked in the forefront of your mind to help remind yourself why you’re doing the activity you’re doing.

3) Practice Belly Breathing

Another helpful tip is one we can learn from babies, which is the act of belly breathing. Inhale slowly, extending the belly outward. This helps draw the breath into the lower lungs and extend the diaphragm. By fully inflating the lungs, you’re also taking in the maximum amount of oxygen possible with each breath. These deeper inhalations keep the body relaxed and help you pace yourself and move most efficiently.


Mindfulness can be an important tool in your training arsenal, especially if you struggle with stress or focus. By practicing being aware and present, you can improve your connection to your body and train both the body and mind as one unit. When it comes to competition or a challenging workout, this can be the difference between success and failure. Give mindfulness a try and see how it impacts your performance!


5 Must Try Yoga Poses for Triathletes

Adding yoga to your life offers many benefits such as increasing mobility and range of motion, preventing injuries, and relieving pain. Hopefully, you already have some kind of stretching routine included in your training. If you don’t, the offseason is the perfect time to try some new things! We’ve compiled a list of the 5 most beneficial yoga poses for triathletes to combat the wear and tear we put our bodies through during training.

1. Downward Facing Dog

Purpose: This is a common pose but is especially beneficial for a triathlete with any built-up tension in your calves and feet from running. Also great for cyclists with lower back from riding. Hold this pose to help build strength in your shoulders, arms, and chest.

How To: Start on your knees with your hands out in front of you, push your bottom up until you feel a stretch in your calves and the bottom of your feet. Straighten your legs if you can, but the main thing to remember in this pose is to keep your back as flat as possible.

Downward Dog

2. Crescent Lunge

Purpose: This pose utilizes all the muscles in your body but focuses on getting a stretch in the back of your legs, groin, and hip flexors while building strength in the front of your legs. Practicing this pose will open your range of motion in your legs and hips.

How To: Start in a standing position, and go into a lunge until your front leg is bent at a 90-degree angle. Keep your core tight to remain balanced as you lift your arms above your head. During this motion, you will feel a stretch in your triceps and chest.  Take deep breaths as you hold this position, switch to your other leg, and repeat.Crescent Lunge

3. Pigeon Fold

Purpose: The Pigeon Fold is a great yoga pose for opening up your hips and getting a deep stretch in your hip flexors and glutes. Good for athletes who spend more time cycling to loosen and realign their hips after putting in hours on the bike.

How To: Start in a Downward Facing Dog, bend your right knee and sweep your leg down and place it on the mat beneath you. Lower yourself to a comfortable seated position with your left leg behind you as you feel the stretch in your quad and hamstring. Hold your chest high to focus the stretch in your legs. Pigeon Fold

4. Cross-Legged Twist

Purpose: This pose focuses on stretching your lats, shoulders, and neck. This will help reduce any pain you may have from constantly rotating your body side to side during your freestyle swim stroke.  Holding this pose will lengthen and help mobility along your spine which is great for increasing your range of motion during your swim training.

How To: Begin on the floor with both legs out in front of you. Bring your knees to your chest and place the bottom of your feet on the ground. Slide your left foot on the ground under your right leg to rest your foot beside your right hip. Bring your right arm across your body and place it against the inside of your left knee. Push slightly to twist your body until you feel a stretch in your lats and shoulder. Cross Legged Twist


5. Bridge Pose

Purpose: Offers relief from pain caused by the position you are in when training on your bike. Good stretch for your quads, chest, and abs while also strengthening your glutes and hamstrings. You will feel this pose strengthens your back muscles to reduce or prevent pain you may have from running and cycling.

How To: Lie flat on your back with your knees bent with feet on the floor shoulder-width apart. Place hands on either side of your body to help keep yourself balanced. Press your feet and arms firmly into the floor and push your hips up off the ground.Bridge Pose


These yoga poses work muscles that are often neglected in the repetitive movements you do while preparing for a triathlon. Get the most out of your training when you add in these 5 yoga poses that are best for triathletes before or after your next workout!

Avoid Knee Pain During Triathlon Training

If you experience knee pain during your training, you’ll want to make some changes to the way you train as well as look into what could be causing the pain. The source of the pain can come from any of the three tri disciplines, so you’ll want to pay close attention to when you feel discomfort to address the problem source. While you do not have to stop training, it’s important to ease up on your training intensity and make some adjustments to the way you train to combat the pain and prevent further harm/damage to your knees. Follow these tips to avoid knee pain during your tri training.

What’s the Problem?

Tips to avoid knee pain while training for a triathlon

Knee pain is a common problem we hear about in the world of triathlon because you’re training for two sports known to cause knee pain. Best described as pain felt above, below, or behind the kneecap that is caused by overuse or misuse during specific physical activities. Knee pain is very common for triathletes, but most often stems from the incorrect form while running or cycling.  It can lead to swelling and even grinding or cracking sounds when doing any physical activity, so it’s best to get to the root of the problem before it’s too late.

Train Without the Pain

Swim

Swimming is the lowest impact on your body in a triathlon. For this reason, it’s the safest alternative to turn to when dealing with knee pain. When hitting the pool for a workout, find a swim stroke style that causes the least amount of discomfort in your knees. Swimming is also an excellent way to alleviate current pain and help you avoid causing any further damage. You can also try focusing on arm-only workouts and use a pull-buoy to avoid making the problem worse.

Bike

Knee pain is typical when riding for extended periods for any athlete. Avoid riding on hilly terrain or unpaved roads to avoid putting too much strain on your knees. Another thing that could be the cause of your knee pain is incorrect bike fit. You can fix this with minor tweaks, like correctly adjusting your saddle height. While this seems minuscule, it impacts your knees much more than you may think. Suppose you are experiencing more pain than usual when out for a ride, this is an indicator to ease up on your training rides. Deal with your current injury to prevent permanent damage.

Run

Typically, running is where athletes feel the most pain and discomfort during training. Running is known to be hard on your joints, but there are ways to reduce this to keep reaching your triathlon goals. An alternative workout for knee pain we recommend is aqua running. If running is especially painful for you, take some time to evaluate your form when you run. Make sure you’re running lightly while maintaining a comfortable stride to avoid heel-striking.

Try training with a group or with a professional coach who can watch your technique and form to help find the source of your problem. It’s always great to have people looking out for you. Plus, you’ll enjoy getting advice from those more familiar to the sport if you are just starting.

When in Doubt, Stretch It Out

Tips to avoid knee pain while training for a triathlon stretches

Pain in any joint is attributed to the tightness and strength, or lack-there-of, in the muscles around it. This is why flexibility and mobility are so essential to avoid further knee pain. There are a number of knee-specific stretches you can do. Most athletes find the effects of stretching properly essential to dealing with knee pain during training. These stretches almost instantly alleviate knee pain and can be done in front of the tv, or anywhere you’d like. You can also incorporate yoga for triathletes into your training to work on strengthening the knee while increasing your flexibility.

Take a Break When Needed

If you are experiencing extreme knee pain, take some time off when training to prevent causing permanent damage. While this may be tough or feel counteractive, you’ll thank yourself in the long run (pun intended). Pay attention to your body, and take a break if you need to. With the help of these tips, save yourself the trouble and avoid knee pain from happening down the road.

How to Fix a Squeaky Bike

You manage to get ready, on your bike, and ready to zen out for some miles when all of a sudden you hear it – squeak… squeak… squeak… AND IT IS SUPER ANNOYING!

Many of us have been annoyed by having a squeaky bike from time to time. The question is, what is it and how do we stop it? There are a few things we can re-tighten and re-grease that make a world of a difference.

First, check your pedals. They do come loose and will make a creaking noise. You should re-tighten and re-grease your pedals periodically, especially if you travel or ride in the rain. Using a bike specific pedal wrench will make it easy to get enough leverage to tighten the pedals properly.

Second, check your shoes and cleats. They may need to be lubed and tightened. Loose cleats can not only lead to annoying squeaks but can also be the cause of pain while riding. Speedplay’s are notorious for having noisy and “sticky” cleats and pedals when they are not lubed properly.

Third, your brakes and wheel alignment. Check both your front and back brake to make sure they are centered. Realign the brakes by pushing them with your hand. If you find your wheel leaning to one side, simply release the quick release lever and let the wheel center itself.

Forth, your chain. Rub your fingers along your bike chain. You should have a light amount of chain lube come off on your fingers. While it may have some color to it, it should not be gritty or thick. If it is, it’s time for a bath or possibly a new chain. If it is dry, be sure to get some chain specific lube on it.

Fifth, your saddle. Check the railing on your seat. If your seat is broken or the railings are loose they will move each time you pedal. If this is the source of your squeaky bike, then don’t keep riding. A loose or broken seat can be dangerous.

Last but not least, check the bolts on your crank arms and cranks. They do come loose and need re-tightening and re-lubing from time to time. If you are uncomfortable with tightening any of these, just stop in your local bike shop. The mechanics are happy to help with a quick safety/squeak check.

Bike transportation is a big culprit when it comes to stuff getting knocked loose. Take your time when loading and unloading your bike. It is also a good idea to do a pre-ride safety check each time you ride. Also, lube is your bike’s friend and it’s not a bad idea to add it to your saddle bag.

Now you can stop the squeaking and enjoy your noise-free ride.


Understanding Lactate Threshold

LACTATE THRESHOLD EXPLAINED

The burning, aching sensation that accompanies intense efforts is all too familiar to athletes. This feeling can also occur when bikers begin to increase their mileage and biking pace. Most athletes have probably heard the terms lactic acid or lactate threshold thrown around by coaches. What do these terms actually mean? Lactate was originally believed to only be produced when the body lacks oxygen. It’s now known you produce lactate even at rest. Far from the cause of fatigue, lactate is shuttled around the body to areas where it is needed as a fuel source such as the heart, muscles, brain, and liver.

During high-intensity training, muscle contractions result in a build-up of metabolites and depletion of glycogen (the fuel inside muscles). This is when lactate is associated with fatigue. At rest and during low-intensity activity, lactate doesn’t build up in the muscles. It is shuttled to areas where it is needed faster than it is produced. Lactate threshold is the point at which the rate of production of lactate is greater than the rate of removal from the muscles. Athletes can only sustain exercise above this threshold for a limited amount of time before exhaustion. Pro tip: this is great information for boosting your mental toughness.

WHY YOU SHOULD KNOW ABOUT THIS

While lactate does not directly cause fatigue, it is still the best metric available for detecting when the body shifts away from mostly aerobic metabolism to rely more heavily on anaerobic metabolism. Anaerobic metabolism can only be sustained for a short period of time before fatigue occurs. Studies show that lactate threshold, or the point at which this transition occurs, is the best predictor of overall endurance performance abilities. If two athletes have the same VO2max, but one athlete can maintain a higher fraction of that VO2max without build up of metabolites (i.e. lactate, hydrogen ions), the athlete with the higher lactate threshold will always win. It’s an objective performance metric that gives invaluable information about your endurance abilities.

Dr. Allen recommends athletes measure their lactate threshold at the beginning of the training season to get a baseline. This can be used to establish training zones unique to their individual physiology, optimize performance, and avoid overtraining. Additionally, he recommends athletes come in for testing once every 3-4 months. This allows the team to monitor training progress and reestablish training zones. As the racing season approaches, the lactate threshold pace can be used to determine exact pacing strategies, no matter the distance. For example, marathoners usually set their race pace right around their lactate threshold. Measuring your lactate threshold gives you the ability to establish your race pace while knowing it’s truly what you’re capable of.

HOW THE MEASUREMENT IS PERFORMED

Lactate threshold can be performed in a clinical setting or in the field depending on the athlete’s preference. Ascension Seton Sports Performance adheres to the most stringent COVID-19 policies. They are also happy to offer the service outdoors if athletes would prefer that. The test involves either running on a treadmill or outdoor track or cycling on a stationary ergometer. As you exercise at increasing intensities their team measures the changes in various physiological parameters. This includes changes in lactate as measured from a drop of blood from the finger or changes in expired gases collected from a mask over your mouth.

ABOUT DR. JAKOB ALLEN

Dr. Allen received his Doctoral training from the nationally ranked University of Texas at Austin. He was an 8x All-American collegiate swimmer at Stanford, American Record holder, NCAA and Pac-10 Champion, and 2x Olympic Trials qualifier. Dr. Allen is now an avid cyclist and triathlete, frequently placing in the top-5 overall amateurs in Central Texas triathlons. He is driven to bring about the greatest potential of all athletes whether you are a weekend warrior or an Olympian.

Dr. Allen currently serves as the Sports Scientist for the Austin Bold FC team in addition to his work in the clinic. He believes that exercise remains one of the best ways to improve every physiological system in the body throughout the lifespan. Whether it’s helping prevent changes in mental acuity or improving muscle function, the benefits of exercise continue to be supported by scientific studies. Dr. Allen specializes in designing exercise training programs for improving muscle and cardiovascular health for aging wellness and masters athlete performance.

6 Best Places to Train in Austin

Here is a list of what we think are the 6 best places to train in Austin. We broke them down by favorite spots to swim, bike, and run. These are great for all levels of triathletes.

Swim

1.Big Stacy

Tucked back in one of Austin’s oldest neighborhoods, this pool has been keeping Austinites of all ages cool and entertained since the 1930s.  The best part is it is free to use year-round, with the added bonus of being heated during the winter months. There are a limited number of lanes so be prepared to share or come during non-peak hours.


2.Barton Springs Pool

Constructed in 1940, it has been a summer staple for many years and is known for being Austin’s no. 1 natural pool.  It’s easy to see why.  The 3-acre, spring-fed pool remains 68°F degrees year-round, making it a refreshing way to shake the heat. It is also a great way to practice open water swimming and swimming in a wetsuit. Get there as early as 5 am on weekdays to swim without the crowds.

Bike


1. South Walnut Creek Trail

The Southern Walnut Creek Trail is Austin’s first Urban Trail. Not a car in sight!  The trail is open for public use and begins at Govalle Park and ends in the vicinity of Johnny Morris Road and Daffen Lane. The trail is approximately 7.3 miles in length and consists of a 10′ wide concrete trail with 2′ shoulders. There are several creek crossings and trailheads on the trail. The lush surroundings can make seeing around corners difficult at times so this is not a great place for a speed workout.


2. Veloway

The Veloway at Circle C Ranch Metropolitan Park was constructed in the early ’90s and was the first facility of its kind in the United States.  The Veloway is a 23’ wide, 3.1 miles (5K) long bicycle tract that traverses the natural terrain.   People travel from all over the metropolitan region to cycle here on a daily basis. This path is great because it is for cycling and inline skating only. Still, be on the lookout for the rogue walker or slower cyclist, slower traffic keep to the right and always pass on the left.

Run

1.Violet Crown

After years of strategic land acquisition and planning, the first six-mile segment is now open and the VCT is on its way to becoming the longest trail of its kind in Central Texas. Once complete, the 30-mile trail will provide a unique recreational experience as it passes through the urban wildlands of the Barton Creek Wilderness Park, the City of Sunset Valley, and eventually into Hays County. Be sure to bring your own water and prepare for off-road bathroom situations as there are no water fountains or bathrooms on the trail.


2. Ann and Roy Butler Hike and Bike Trail at Lady Bird Lake

The go-to spot in Austin. The urban path meanders along the water’s edge and passes by skyscrapers, neighborhoods, ball fields, and cultural attractions. With the completion of the Boardwalk portion of the Trail in June 2014, the trail no offers a full 10-mile loop. The different street crossings at Lamar, 1st Street, and Congress make scenic and convenient crossovers for making this distance you are looking for. With more than 1.5 million visits a year, the 10-mile trail is Austin’s most recognized and popular recreational area.

3 Tips for Running During the Holidays

Stay on top of your running during the holidays with our advice

The holiday season is fast approaching. You might wonder if you can keep your running schedule going without any disruptions. Spending time with your family and friends, eating your favorite Christmas meals, late nights, and drinking can make running during the holidays quite the challenge.

If you don’t go for a run regularly, you can feel out of shape. So how can you keep running during the holidays? Follow the advice below! Prepare accordingly, stay on track with your running schedule, and have a wonderful time this holiday season. Pro tip: preparation is crucial and one of the main habits of successful triathletes.

Set a goal

One of the best ways to keep yourself running during the holidays is to set a goal. For instance, a goal can include a specific number of miles or a fixed amount of time every week. Another option would be to start a running streak by setting a schedule. Feel like your running is in a rut? These training tweaks could improve your performance.

You can register for an event, like the Ascension Seton Austin Marathon. Having a goal race on your calendar will push you to run regularly. Keep in mind that it doesn’t have to be a big event to get you running during the holidays. Even registering for the Run Austin Virtual Series’ Armadillo 5K or Makin’ Music 4-Miler can do the trick. All you need is to create goals that will motivate you to go for a run regularly.

Go with the flow

During the holiday season, you are bound to have family, work, and travel commitments. They affect how much time you can spend training and keeping your body healthy and fit. When it comes to running, the first thing you should do is take a look at your schedule. If you have any commitments, avoid canceling your run. Instead, make adjustments to your running schedule. If you feel like going for a run outside of your “planned time,” do it. You never know what might happen to prevent you from running. Pro tip: remember to leave some time for the important warm-up and cool-down.

Have fun

The most important thing when it comes to winter training is to have fun. Although the holiday season is a time to enjoy and relax, it may not always be the case. Sometimes, you have to crunch extra hours at work to spend time with your family and friends. For a lot of people, the holiday season comes with a lot of stress. The best way to deal with anxiety-inducing situations is to take a break from them. You need to relax to recharge your mind and be ready to deal with anything that comes your way.

When you are suffering from a mental block, going for a run can help you significantly. By taking your mind off the situation, you can come back and visit it with a fresh and new perspective.

At the same time, you should also make sure you get adequate amounts of sleep. This helps your body recover and should be a major part of your winter training schedule. After all, you don’t want to burn your candle at both ends, as this will make it harder to go for a run regularly.

Don’t stress out if you miss a run or two. As long as you do as much as you can every day, you’re doing a wonderful job!